Trax Editor and Time Warps: Part 2

November 24, 2009

So in part one we created the walk cycle and our character set. Now it’s time to bring that cycle into the trax editor!


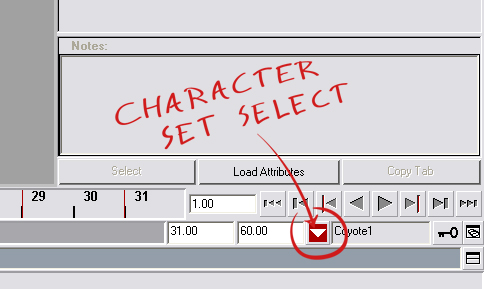
First we want to make sure our character set is selected. You’ll want to click and hold onto that down arrow button to the right of your timeline length numbers.

CharacterSetSelect

The selected character is shown to the right of that, as evident through the screenshot. Something to note is that I forgot I had an object or control already named Coyote, so maya automatically added a 1 after it. It’s ok and shouldn’t affect anything that we’ll be doing. I left that mistake in there to let you know that it would still be ok if you accidentally did the same.

Now that we have our character set selected, it’s time to make that cycle actually cycle! Your trax editor probably still looks like what it did before. All we see is a soundtrack. To be able to see our new character in the trax editor we have to load it. With your character set selected (check the bottom right), press the Load Selected Character button found here:

TraxEditorLoad

TraxEditorCharEmpty

A layer has been created inside of the trax editor, with the name of our character set. It can’t be seen yet, but this is where our cycle will be kept in. With our character set still being selected (bottom right arrow still red with the name of your character set written), go to:

Create > Animation Clip > Dialogue Box

TraxEditorAnimationOptions

This presents us with some new options!

CreateClipOptions

The name is what we want to call the clip. In this case its a walking animation, so I just use Walking. The next important option is to choose where to put the clip. How trax editor works is by keeping the clips we create in what’s called the Visor.

Since we want to use the clip already, we can skip that extra step of dragging and dropping from the visor, and let the clip be put into the trax editor for us. The time range is how long the cycle is. If you know what your frame range is you can specify it here.

TraxEditorClip

Sweet! Now we have our cycle! All the keys you have on your character should have disappeared, and we now have our clip in the trax editor! Now if you were to extend the timeline so that its longer than your clip, you should see that.. it still stops after the first one! That’s because we have to extend the clip so that it can cycle! There’s a couple different ways to do that. You can do it in the trax editor, or by selecting the clip in the trax editor, and bringing up your attribute editor (alt-a).

Let’s say we want our Coyote clip to extend 100 frames. We can do that by moving our mouse to the right hand side of the clip in the trax editor, holding shift, and then clicking and dragging. What it does is add more Post Cycle‘s, which is how you would extend it via the attribute editor.

ClipAttributes

Now the bulk of the work is out of the way. Unfortunately that doesn’t mean it’s time for the easy part. Next installment is going to be the actual use and practice of using the time warp. Things are only going to get more confusing from here on out, but bare with me and it’ll be hopefully worth it in the end! Stay tuned!

Trax Editor and Time Warps: Part 1

November 23, 2009

This isn’t directly dome related, but I thought I’d post about it anyways. I ran into a recent problem in Maya having to do with the trax editor. I wasn’t that well-versed in the trax editor’s inner-workings, so there was a steep learning curve for me. I wanted to write about what I learned, so that someone else who hasn’t ever used the trax editor, might get that extra step in the right direction.


Non-Linear Animation

These are the fancy words used to describe the purpose of the trax editor. It may be a little confusing at first, but it basically just means cycles.

Linear

NonLinear

So now that we can establish the difference between Linear and Non-Linear animation, we’ll have to think which would suit us best for what it is we want to do. In my case I was needing to have a character walk. This is perfect for cycles, so Non-Linear animation is the way to go. Trax editor here I come!


But first we need a walk cycle!


Here we go! Just threw together this walk cycle very quickly as an example of what you may have.

Coyote

This was a quick walk cycle I threw together as an example of what you may have.  Coyote’s feeling pretty good about himself, and rightfully so! What we’re going to do is turn him into a:


Character Set

In Coyote’s particular case, his cycle is 31 frames long. Your cycle is most likely different from this length, so you’ll just want to remember to adjust the numbers so that they’ll fit your own animations. What we’ll want to do is open the Trax Editor. You can open it if you haven’t already by going to:

Window > Animation Editors > Trax Editor

You’ll be presented by this lovely window:

TraxEditorBlank

Now that we have Trax Editor open, its time to select our character so that we can make that character set! You’ll want to select everything that has a key on it. In Coyote’s case, it’s the curves that are used to control his joints.

CoyotePreSelectCoyoteSelect

Now that we have everything with keys selected, it’s time to turn him into our Character Set. We can do this by going to the trax editor and clicking:

Modify > Create Character Set > Dialog Box

TraxEditorCharacterSet

What this does is present us with our options for our character set.

CharacterSetOptions

So the important thing is to give your Character Set a name. It can be whatever you’d like it too be. In this case I called it Coyote. The other options depends on what you’d want. Usually the default is the way to go. If you also keyed the scale, you’ll want to be sure to uncheck that one. I’ve left mine how you see it here. After you hit ok, you shouldn’t need to touch your controls or joints again!

Now that we have our character set created, we can move onto to making the cycle in the trax editor, which is continued in part two!

Full dome 2d compositing tricks

November 9, 2009

I figured its about time to reveal a little bit of the tricks we’ve picked up for doing simple effects on the dome that enhance the viewing experience and make production a little less 3d heavy. Granted some of these effects aren’t physically accurate, and if done to certain extremes can break the illusion of the dome space.

When using a panorama on the dome, or any type of still image, the viewer will become aware that it is a still and quickly grow board of it once it hits a static position. So to prevent a sequence from becoming static we will add a slight rotation of roughly 5 degrees or more depending on length to the entirety of a shot. What this does is keep the pixels moving on the dome surface and has a subliminal effect on the viewer. The won’t notice its there, but they’ll notice it if it wasn’t there.

Push

Another trick is using scale. Scaling a dome master or a panoramic actually translates into movement on the dome. A scale with its anchor point at the zenith translate to vertical movement up or down into a panorama. Coupling this with some images of clouds on 3d layers in after effects you can give the illusion that you’re moving up off the ground and into space without having to create a 3d scene and camera move. Another trick involving scale is to use a null object on a dome master and scale toward the point of focus. Doing this by 3-10% over the course of several seconds gives a slight push that focuses the viewer toward the source of the scale. True you’re scaling pixels and distorting the image over the dome surface, but by only increasing it by a little amount over time you’ll never notice any resolution loss, or the angular distortion that takes place. Also by offsetting your foreground and background images, i.e. your panoramic foreground and stars as your background. You can simulate the natural parallax that happens in a camera move.

ZenithScale

Keep in mind that nothing should ever really stop moving on the screen unless its an intentional freeze frame to illustrate a point. Rather than taking an object’s scale from 0-100 in 3 seconds when your sequence is 10 seconds long. Consider taking your object from 0-95 in that 3 seconds and then ease in that last 5% over the course of the remaining 7 seconds. The effect will look more polished and make your point of focus a touch more dynamic.

enjoy these video examples.

<img src="http://whenindome.web.unc.edu/wp-content/uploads/sites/10008/2009/11/Pushmovie-83×83.jpg"

<img src="http://whenindome.web.unc.edu/wp-content/uploads/sites/10008/2009/11/ZenithScaleMOVIE-83×83.jpg"


Transitionally Transitional

November 3, 2009

We may have briefly touched on this idea, but I wanted to address this more directly.


A lot of techniques used in flat screens naturally do not translate very well into the dome. Wipes used for a flat screen would work differently for domes, linear or radial. Things that should be kept in mind is having to account for the distortion of the projection onto the curved surface. It doesn’t mean you can’t do these sorts of transitions, you just have to approach them with a different understanding.


When knew we wanted to do a linear wipe for a particular scene in Earth, Moon, and Sun; for that show we used an animatic for the flat screen. We didn’t think it to be a problem until we started production. The wipe in question was one coming from the top of the frame to the bottom. The thing was that since you can see above you in the dome, the wipe wouldn’t really be possible, or effective. We had to scramble to figure out another way to have this linear wipe, and to make it fun and interesting at the same time.


The solution was to treat the dome as a sphere, and have our hero, Coyote, flip us onto our backs, letting the wipe come from behind us to the front.


CoyoteFlippingOut


Transitions from one shot to another when not using cuts must really be thought through very carefully for the dome. Creativity can really be challenged, and lots of new and interesting ideas can come from unlikely places.

LadyBug3 camera

October 30, 2009

ld3_white_background_largeThere’s been a lot of talk and some experimentation regarding using one of the Red cameras to shoot video for the dome.  The footage I’ve seen coming from the Red looks decent on a 2K system, but on a 4K system, it’s just not there yet. Just a bit too blurry and not ready for prime time.

I’ve been interested see that Aussie dome superstar Paul Bourke has been messing around with Point Grey’s Ladybug3 camera, a spherical digital video camera that works in a somewhat similar way to the Immersive Media camera that The Goog uses for Street View. Check out the installation that he did at the Wollongong Science Centre:

http://local.wasp.uwa.edu.au/~pbourke/exhibition/Wollongong/ (Scroll down on the page for the video that showcases it.)

While the subject matter (a lab interview with some composited molecular models) isn’t exactly screaming for 360 dome treatment, it is pretty interesting and opens up a host of possibilities. Best of all, he recorded the footage straight to a MacBook Pro. He mentions that the “spherical resolution” is 5400×2700.  Does this mean that it’s half that (2700×1850) on a dome hemisphere? Either way, it’s basically at the same place as the RED camera. Not quite ready for 4Kx4K. But at least there’s another possibility for the future. Hey, if Canon can get the 5D to shoot HD with real lenses somebody is going to break the 4Kx4K barrier soon.

Dome “In style”

October 26, 2009

We’re approaching a new show, with an even newer frame of mind. Currently our shows have had a bit of a mishmash style bordering cartoonish/realistic. The challenge being how does one do scientific content without reflecting some realism in the images that are created. Obviously, until live action video catches up to the dome, everything depicted will be a simulation, or digitally filtered into some variation of artistic interpretation. It would be nice to push a specific style forward, and try to really keep it consistent through the whole show. I’ve seen some other productions out there that use some stylization for portions of their show but end up falling back to the semi photo real content.

Domefest has always been a great place to check out some more experimental art direction, and visual concepts. I’d like to be able to do a collection of music videos themed for the dome and explore the potentials of certain styles on the dome.  Like the following examples.


Red Hot Chili Peppers – OthersideThe funniest home videos are here

What does it take to make a fulldome show?

October 22, 2009

wall-e-poster1-big copyIt takes a little more than grit and perseverance, although that probably helps. In the analog days, at least at Morehead, planetarium shows were put together using about 60 slide projectors, 3 video projectors, a slew of opti-mechanical do-dads, a computer to time everything out and a huge star projector that sat in the middle of all of it. The production staff consisted of two people, an outside contractor to do some artwork and a music composer.

Now that we’re in the process of going digital, it will be very different within the planetarium dome itself. The plan is to have two huge projectors that will project a 4000×4000 pixel image onto the screen. To put that in perspective, it’s roughly 8 times bigger than High Definition television. But the production staff is fairly similar. We’ve now got a producer, a director, two main animator/compositors/creative directors, the same music composer we used for the old shows, support from the Morehead staff and others here and there.

It takes this 4-5 person crew anywhere from 9-15 months to create a 3D animated 25 minute dome show, depending on the content and situation. To put that in perspective, it took Pixar up to four years, at least 400 people and $180 million to make Wall•E. Compared to that, we’re definitely coming in under budget.

If its not broke, Fix it?

October 12, 2009

The  time has come for us to consider some software upgrades. Let me preface this with the fact that generally I’m a content generalist. The majority of my knowledge is in the design and creation of content in multiple software packages, but requires me to know a little bit about the technical aspects of the software the we use.

Currently we run the following software packages:

  • 3ds Max 2008
  • Pixologic Z-brush 3
  • Maya complete and unlimited 2008
  • Mental Ray for Maya 3.6.1
  • Adobe After Effects CS3
  • Frantic’s Deadline 2.7

When considering a software upgrade, there are multiple factors.  One might be inclined to think that the cost per product would be the largest factor, but really the main concern is cost in time to install, trouble shoot, and hope that the upgrade doesn’t disrupt the current pipeline setup.  Our hardware set up includes a mixture of PC’s and Mac’s. For our PC’s we have 2 primary workstations and and 23 Render machines supplied by BOXX technologies.WorkstationrenderfarmExtreme

On the Mac side of things we have 4imacs and 1g5 workstation. They’re generally used to create base assets that eventually get moved into the PC realm and finalized anyway.

We’ve got our eyes on upgrading the software to the following versions.

  • 3ds max 2010
  • maya 2010
  • mental ray 3.7
  • Deadline 3.1

We’ve also considered moving to cebas’s Final Render, but this change will be put on hold due in part to the fact we’re running 2 different 3d software packages. The support has arisen for both independently, but there is talk to have one standalone engine that both 3ds max, and Maya can use simultaneously.


Not all that it seams

October 5, 2009

Seams can be a problem not only in the dome master frames, as Pete illustrated in previous posts, but also in the projectors themselves. I learned from our resident dome expert, Eric Knisely, that seams can present themselves in the projectors themselves. Constant maintenance is needed to keep these projectors calibrated, and not every planetarium may be keeping up with theirs. Eric let me know how using solid colors can really make these seams stand out. He suggested that noise be added to them to break up the constant color, where even gradients may fall short. I can show in these quick illustrations below the scene that brought this problem to light, pardon the pun. The seams I put in are of my own doing, but I tried to make it reflect what we saw in the dome the best I could. The dome at RENCI uses 4 cameras, so the seam across the top was a cross shape.


The first example is what it would look like had it been with just a single projector.

Projector01

The second is the same image projected using 4 projectors.

Projector02

The third is with the noise applied to the sky, breaking up the values to help hide the seams.

Projector03

Explaining Fulldome without being in the dome.

October 5, 2009

It’s always hard to explain exactly what the fulldome experience is like without being there to see it in all its 4K glory. Especially if the person you’re talking to has never been in a planetarium, or as in some cases, has never heard of a planetarium (yes, those people are out there). xRez Studio, the team that produced “Crossing Worlds,” which won the Domie this year for best immersive world design, just put up a interactive video pano in which the user can move around a virtual dome space while a full dome show is playing. It may help in our collective struggle to explain to the uninitiated exactly what it is we do. You can check it out here – http://www.xrez.com/cw_video_pano/ – just click and drag to pan around and scroll to zoom in and out. Also, check out Crossing Worlds.