
Working Against Distraction

November 7, 2016

Often times when I’m working I’ll be listening to an album or podcast, sometimes having a documentary related to what our current project is playing in the background. However, every now and then I’ll throw my headphones on and hours will pass and I realize I hadn’t been listening to anything at all. It’s those times I find myself getting “in the zone” easiest and for the longest periods of time. I’ve found that a way to help myself concentrate is to have the best of both those worlds by listening to a white noise generator of sorts. Rain and thunder off in the distance, a bubbling brook, rustling leaves or a fireplace popping every now and then. There are a couple sites I go to for this. The first is a very simple and easy to setup website called A Soft Murmur. A more complex and expansive website is MyNoise. These sites have really helped me with concentration, and it sure beats listening to silence through headphones.

One Install to Rule Them All

September 28, 2016

scriptcut01

Since joining the team here at Morehead, I have been blown away by the potential of “The Dome” as a medium for presenting content. With the rise in popularity of creating spherical content for VR and Immersive Video, I think there will be more and more variety in the type of content that is being created for domes.

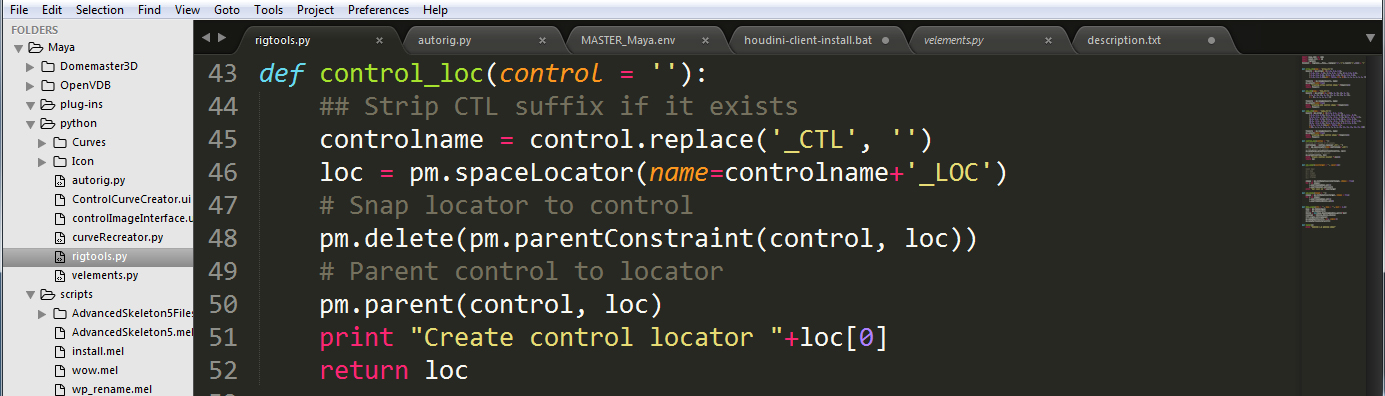
On the technical side, we have been evolving our pipeline for 3D production to allow us to move away from Mental Ray for Maya  and adopt V-Ray as our primary renderer. (Stay tuned for some more info on that…it’s an amazing tool!) We have also added a few plugins and scripts to our tool-box, most notably Peter Shipkov’s SOuP (www.soup-dev.com) and Open VDB Toolkit (http://www.openvdb.org). With all of these changes and additions, we needed to come up with a way to easily manage plugin installs across our user machines and the render farm. The ideal solution for us was one that allowed us to install plugins and scripts to a single network location that all machines pointed to. The standard approach for single users is to just install what you need on your local machine. But this can quickly become a mess when more than one artist is working on a project. Of course having a render farm makes things even more complicated. Unfortunately, many places just go without many useful tools or updates because the install/update process can be such a time-sink. But from my previous experience I know it doesn’t need to be a big deal to add and update tools.

I know this post may not seem like a thrilling artistic explosion. But the value of a bit of laying a bit of pipeline can allow you to work much more efficiently. Give it a try, even if you have no experience with this kind of tinkering. You’ll be amazed how easy it is.

Environmental Changes:

I am far from a systems master, but had enough familiarity with the environment variables that Maya uses to look into a solution. The main focus of my research was the Maya.env file that exists here:

 C:\Users\<user>\Documents\maya\2015-x64

Maya looks at this file when it loads and this can be used to define additional paths for scripts and plugins. By default, this file is empty, hiding how useful it can be.
But a quick look at the Maya help documentation outlines the way that this file can be used to create a more flexible setup for your work.
Autodesk Documentation for Maya.env

Here is a little breakdown of some basic variables in Windows formatting:

SHARED_MAYA_DIR = \\<<network location>>\Maya_Content - This is a user defined base directory for additional maya content.
You will see in the next entries how this is used

MAYA_SCRIPT_PATH = %SHARED_MAYA_DIR%\scripts;  - Here we see the %SHARED_MAYA_DIR% variable defined in the first line is used
as the root for the scripts directory it contains. Doing this allows all the paths to be updated by changing a single variable

MAYA_PLUG_IN_PATH = %SHARED_MAYA_DIR%\plugins; - This is another standard variable that Maya uses to browse for plugins.
Using the same base directory, we can store them in a common location to easily update for all users.

TMPDIR = D:\tempspace  - You can even define where Maya saves crash files so that they are easier to access

There are many different standard environment variables that Maya can use to load different content.

Here is the root list link: All Maya Environment Variables
The variables that we’ve been focusing on are the ones in the File Path Variables section.
But there are tons of useful paths that are worth a look.

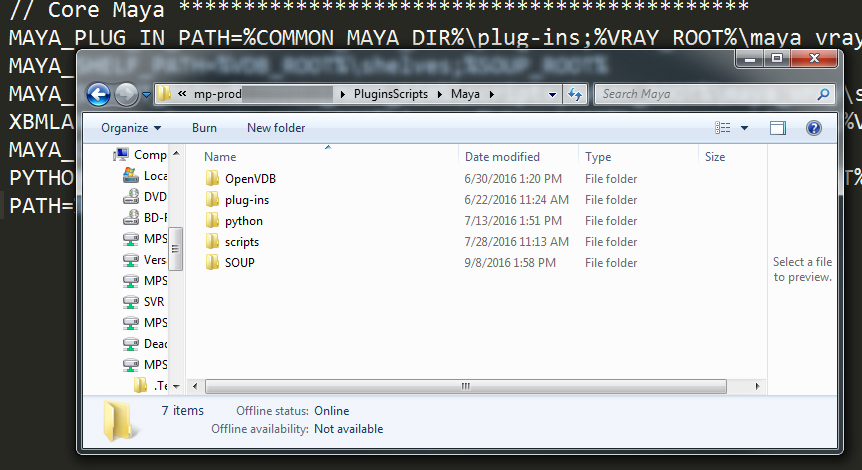
So here is our directory structure we built on a network location that our workstations and farm machines have access to:

pathexample

And here is the content of the Maya.env file that we assembled to set all the paths to give Maya full access to this content: (The //**** lines are just comments for organization.)

// ROOT PATH ******************************************
COMMON_MAYA_DIR=\\mp-prod[][][]\PluginsScripts\Maya

// OPENVBD ********************************************
VDB_ROOT=%COMMON_MAYA_DIR%\OpenVDB

// SOUP ***********************************************
SOUP_ROOT=%COMMON_MAYA_DIR%\SOUP

// Core Maya ********************************************
MAYA_PLUG_IN_PATH=%COMMON_MAYA_DIR%\plug-ins;%VDB_ROOT%\plug-ins;%SOUP_ROOT%
MAYA_SHELF_PATH=%VDB_ROOT%\shelves;%SOUP_ROOT%
MAYA_SCRIPT_PATH=%COMMON_MAYA_DIR%\scripts;%VDB_ROOT%\scripts
XBMLANGPATH=%COMMON_MAYA_DIR%\icons;%VDB_ROOT%\icons;%SOUP_ROOT%\icons
MAYA_CUSTOM_TEMPLATE_PATH=%SOUP_ROOT%\viewTemplates
PYTHONPATH=%MAYA_SCRIPT_PATH%;%COMMON_MAYA_DIR%\python;
PATH=%VBD_ROOT%\Arnold\bin

With this in place, we are able to update scripts and plugins as needed while staying out of the standard Maya directories. We can even update our Maya installs and not need to re-install any scripts or plugins if they are compatible with the Maya version. The only file that needs to be moved around is the Maya.env file.

Spreading the Word:

This brings us to the final piece of the puzzle. Managing a master Maya.env file and be able to update this file on multiple computers. I wanted to be able to update a single master Maya.env  file and have it instantly updated on all user computers and the render farm. This would minimize the workload for the systems team and allow us to add and edit our tools as we needed. I came from working in a Linux production environment where we used something called a symbolic link or “symlink”. This A symlink creates a file at one location on a computer or network that reads data from another location. To the computer, it treats it like the actual file. But on the management side, it allows multiple dynamic copies of a single file to exist.  This is not the same as a standard windows shortcut. Shortcuts are actually a file of their own, a .lnk file. So those wouldn’t work for the type of functionality we need. Maya is looking for a file called Maya.env. It doesn’t know or care the the Maya.env file it is finding is, in fact, symlinked to another file on the network. Our more computer savvy readers may already be shaking their heads at the methods we are using, hopefully this is good for a laugh at least. This method works great for us.

Check out the Wikipedia page on Symlinks for a bit more info about linking and other options

Here is the outline of the command we used to create the symlink to our master Maya.env file:

mklink "target\path\Maya.env" \source\path\MASTER_Maya.env

This is run from the command prompt, or just put something like this in a text file and save it as a .bat file. Double click on the .bat file to run it. That’s it. I know. Kind of anti-climatic. But once the link has been created, you can edit the master file and all of the linked files will update. We created links on all of the farm machines and now hopefully we won’t need to do any manual installs on multiple machines except in the most extreme cases.

In my next post, I will talk about making cool images…but this was a big step for us here at Morehead and we wanted to share it with you.

UV Passes

September 9, 2016

Since Ben Fox has started working with us, I’ve learned a lot. One thing I learned is that I’ve been doing things the hard way (or at least terribly inefficiently). One of the tools he introduced me to is UV passes in Maya. UVs are just floating numbers between 0 and 1 that designate what pixel should be seen where. It’s for that reason that you don’t necessarily have to apply textures to your models in Maya. You can just apply the textures in your compositing software (in our case After Effects). There are some limitations with this method, such as reflections or final gathering that would be calculated when you add your texture in After Effects, but for simple things it works very well. In the past I would output an image sequence for an animated texture to bring into Maya, but by using this method I can just apply it to the UV output that was set up in Maya.

How do you apply a UV pass in Maya? Apply this shader to any object of your choice (which was quickly put together by Ben for me). Then rendering with a 16 bit or higher image format that allows you to bring the sequence into After Effects and apply your own texture using this effect made by François Tarlier called ft-UVPass.Be sure that your Project Settings in After Effects are set to 16 bit as well. Excelsior!

Welcoming Ben Fox

August 5, 2016

7779751_300x300We’ve got a new digital artist here at Morehead and we’re pretty excited about him. His name is Ben Fox and he was doing VFX and animation up in New York at Framestore for about 10 years before recently moving down to North Carolina with his family. Before joining Morehead, he worked on everything from major motion pictures to high end commercials. He was also on the VR team producing content for Marvel, the movie Interstellar and the well known Merrill Trailscape VR project.


He also worked on the Generation Beyond Mars Experience Bus “the first immersive VR vehicle ever built and it replicates the Martian landscape. Riders experience a virtual drive along the surface of the Red Planet” as the bus drives around town.

Check out more work for Ben at his website.

Animating Characters in After Effects and Maya: Part 3

May 5, 2016

I thought I’d throw a couple extra Maya related things that I didn’t include in the previous posts.
The first is a shelf button that switches to your custom viewport setup and turns off all your selection options except for nurbs. I find it handy for quickly diving into a scene when it’s time for animating.


  1. Setup and arrange the viewports to your preference. In my case I use 3 viewports, a perspective cam with everything except polygons and nurbs curves turned off, the fisheye render cam (that I sometimes swap for an aim camera for animating characters) with only polygons visible, and lastly the graph editor (which I sometimes undock).
  2. Save the layout by going into one of the viewports and choose:
    1. Panels > Saved Layouts > Edit Layouts…
    2. New Layout
    3. Pick a name (in my case it’s FragOut)
  3. Go to Windows > Settings/Preferences > Shelf Editor
  4. Create a new shelf button with a name and icon of your choice
  5. Right click on your newly created button in the shelf and choose Edit
  6. Paste this in the command tab:


select -d;
setNamedPanelLayout “FragOut”;
string $panelsAll[] = `getPanel -type modelPanel`;
string $current;

for($current in $panelsAll){
modelEditor -e -allObjects 0 $current;
modelEditor -e -nurbsCurves 0 $current;
modelEditor -e -nurbsSurfaces 1 $current;
modelEditor -e -polymeshes 1 $current;
modelEditor -e -manipulators 0 $current;
modelEditor -e -manipulators 1 $current;
DisplayShaded;
}
setObjectPickMask “All” 0;
setObjectPickMask “Curve” true;
modelPanel -e -mbv 1 modelPanel4;


Layout


You’ll want to make sure to use the correct name for whatever you named your layout.


The other not so complicated thing I’ve come across is a motion path tool from Tool Chefs. It’s an incredible tool that’s super lightweight and has a ton of functionality (drawing arcs and moving keys without moving on the timeline). Definitely check it out, it’s worth it.

Morehead Planetarium looking for new Digital Artist/Animator

February 17, 2016

We’re looking for a CG generalist/2D animator to join a production team responsible for developing fulldome digital planetarium films, exhibit and flat screen media designed to engage, inspire and entertain school children and the public about science.

To apply, please go to https://unc.peopleadmin.com/postings/92292

Attributes of the successful candidate include:

  • Advanced knowledge of professional-level 3D animation, motion graphics, compositing, visual effects.
  • Strong art and design background.
  • Knowledge of story fundamentals and experience working with writers.
  • Desire to work with UNC faculty and current subject matter experts to help them shape ideas and concepts into effective visuals.
  • Impeccable sense of timing for animation and camera essential.
  • Clear understanding of the production pipeline and workflow.
  • Excellent interpersonal skills and desire to work as part of a team.
  • Ability to offer technical, pedagogical, creative, aesthetic, and practical input into decision-making processes, content storyboard production, and media production.
  • Impeccable organizational skills.
  • Ability to troubleshoot creative issues related to production.
  • Ability to accept criticism and translate feedback into goals, objectives, and solutions.
  • Able to adhere to naming conventions and studio guidelines.
  • Able to communicate effectively and complete scheduled tasks on time.

Qualifications:

Design professional with a B.A. in computer science, communication, arts, media arts, or a media-related field, or comparable training and experience in a media-related field. Master’s preferred. Additionally, Morehead Planetarium and Science Center seeks a production professional with significant experience with digital animation.  Advanced knowledge of professional-level digital 2D and 3D design software is required, particularly Maya and After Effects.

Production experience in an academic or informal science center setting is preferred, as is experience developing materials for K-12 audiences.

This position is a continuous 1.0 FTE position.

To apply, please go to https://unc.peopleadmin.com/postings/92292

Closing date for applications is March 15, 2016.  For additional information about Morehead Planetarium and Science Center, please visit our website at www.moreheadplanetarium.org.

The University of North Carolina at Chapel Hill is an equal opportunity and affirmative action employer. All qualified applicants will receive consideration for employment without regard to age, color, disability, gender, gender expression, gender identity, genetic information, race, national origin, religion, sex, sexual orientation, or status as a protected veteran.

Animating Characters in After Effects and Maya: Part 2

February 10, 2016

Animating the Wright Brothers was a combination of lessons learned from Solar System Odyssey, and techniques used in Grossology and You. Firstly, during the scriptwriting phase we wanted to limit their on-screen time. One of the biggest hurdles of Solar System Odyssey was too much character animation and too many characters. Second, we wanted to build the characters in a way that was the least work, but still plausible. We decided the best way to accomplish this was to make them “stick figures” that were drawn by a person (who we don’t necessarily need to introduce), with the faces animated to imitate a photograph that was cut-out. This sped up production in two ways:


  1. With the bodies modeled as pencil lines/sticks, it made skinning the character much faster.
  2. The faces are animated in After Effects with simple animations compared to Grossology and You. A major problem that happened with Solar System Odyssey was spending time creating hundreds of blendshapes between the three characters, only to not use them in actual production due to time constraints.


The way I rigged the face was using the same technique from Grossology and You, albeit much simpler. Since a bit of the charm is the crudeness of a cut-out, the only secondary motion I added was on Orville for his mustache.

OrvilleFace

One of the concerns of going with stick figure characters was the arms/legs getting lost when passing in front of other parts of their bodies. I had to do some careful staging when it came to animating, but I made a quick test animation to test the concept.

OrvilleDancing

Rigging and texturing the character in Maya was only a little complicated, but not nearly as time consuming as doing the same for the characters in Solar System Odyssey. The most complicated part was rigging the head. I wanted to have control over the twists and bends of the paper head, so I used a lattice driven by clusters and set driven keys.


The eyes are animated in Maya, using set driven keys to move the UVs on a sphere that was flattened. The reason I flattened a sphere instead of just using a flat plane was to distort the iris’ shape and speed when approaching the side of the sphere to give a sense of depth.


For the faces in Maya, I didn’t want to have two planes squished together for the front and back of the photograph since there would be a good chance they pass-through each other when the head is turned or distorted. The solution for me was to use a single plane and have a shader for their heads use a condition node to show different textures for different sides of the plane. When I hooked up the transparency to the shader it behaved strangely, so I fed it through a ramp node which fixed the problem.

OrvilleShader

Lastly, for a final touch I wanted to help push the idea that they’re drawings and make them a bit more interesting to look at. I made a quick cycle between blendshapes to make the lines wiggle a little and give them a bit more life. I figured it’d also help in case there were any breathing holds I wanted to do down the line.

Wiggle


Now on to the animating.


The tool I used the most was aTools. It is an immensely useful tool created by Alan Camilo. It has tween machine built in for keying, and made it easy to set up control group pickers for quick selections. You are also able to turn on arcs for your selections to find and fix weird translations. I heavily recommend it.


As for hotkeys, here was my main setup:


J – timeSliderClearKey;
K – timeSliderCopyKey;
L – timeSliderPasteKey false;


Using the keys < and > I can hop between keyframes, using J for deleting them, K for copying them, and L for pasting them.


I also found the hotkey \ useful for zooming in on the viewport without moving the camera. Since sometimes I can’t fall back on using my flat playblasting camera used for animating, I needed to use the fisheye one instead which doesn’t always see everything.


That’s the long and short of it. I did the usual routine of storyboarding, animatic/previz, shot some reference, and then began animating. Unfortunately, even with the shortcuts I did for building the characters I still ran into a bit of a crunch animating, due to rendering and lighting issues with the office that needed to get resolved. I’ll save that one for another post. Due to the office hangup, each scene needed to be completed in a week to a week and a half, but this time the characters were simpler and fewer in number, making this goal much more achievable. I’ll end this post with a short clip and the storyboard that preceded it, to show a bit of the process:

Animating Characters in After Effects and Maya: Part 1

January 12, 2016

BoogieSmall


There were a lot of things I’ve picked up over the past couple projects that I wanted to share. It’s a bit of the process and includes After Effects expressions and using hotkeys for animating in Maya. This first part details how I animated the characters in our show: Grossology and You. You can see a trailer for this show on Fulldome Database:

http://www.fddb.org/fulldome-shows/grossology-and-you/


Much of what is posted here can be found in the Digital Tutors series Rigging and Animating 2D Characters in After Effects by Dan Gies, which can be found here: http://www.digitaltutors.com/tutorial/796-Rigging-and-Animating-2D-Characters-in-After-Effects


At the start of the Grossology and You process, we wanted to make sure I had enough time to animate the characters. We went with a game show type format, which meant we’d need multiple characters representing contestants, a show host, and a character for the audience to identify with. Two ways for us to help lighten the load on my end were to have a limited amount of time we’d see the characters, and to make them very simple in rigging. The lessons we learned through Solar System Odyssey really drove these points home. I spent roughly 3-4 weeks sketching, modeling, texturing, and rigging each of the three characters with The Setup Machine 2 and the Stop Staring method for the faces. Unfortunately, this caused the time allowed for animating to be crunched, and sadly, the work put into the character’s faces was unused along with unpolished body animation. In total, there were roughly 15 minutes of character animation in the show with a minimum of 3 characters on screen at all times. It was from this lesson that we made sure Grossology and You had a significantly smaller amount of time spent with the characters, and they would have only what’s needed in terms of rigging.


BoogieOverlaySmall


For Grossology and You, I had the pleasure to work with the artist for the Grossology book series, Jack Keely. Jack sketched up character designs for us, and when they were finalized sent them my way to get rigged.


The process for the rigging was mostly straight-forward. I used Dan Gies’ tutorial on Rigging and Animating 2D characters, and adapted it for the simpler drawings (his tutorial also included things like animating bump maps IIRC which I didn’t opt for using). The character’s body (in this case Boogie) was rigged using DuIK.


A major expression used in this process is to parent Puppet Pins to Nulls. Here is the expression:


n=(pickwhip null of choice);

nullpos=n.toComp(n.anchorPoint);

fromComp(nullpos);


And an example from Boogie:

ParentPuppetToNull


What this allows is the use of DuIK to create the Inverse Kinetics used to control the puppet pins. It also allows for other fun ways to control the character.


I worried that seeing 2D animated characters on the dome might not be that interesting to watch for long periods of time, so I decided to have a lot of secondary animation to keep it interesting. I also wanted it to be automated for the most part, to help save me time. Using the nulls controlling puppet pins, I could accomplish a very basic sense of secondary motion by having the movement delayed.


I took the Null controlling the Puppet Pin and used a frame delay expression to “parent” it to another null. Here’s the expression:


cX=thisComp.layer(“null of choice”);

pX=cX.toWorld(cX.anchorPoint,framesToTime(timeToFrames()-1))[0];

cY=thisComp.layer(“null of choice”);

pY=cY.toWorld(cY.anchorPoint,framesToTime(timeToFrames()-1))[1];


PosX=pX;

PosY=pY;


[PosX,PosY];


I can then parent that controlling null to whatever I’m animating the position of, in this case Boogie’s head:

FrameDelay


On my next post I’ll talk about what I did for tackling the characters in our newest show, Take Flight!

Grossology and You

September 1, 2015

During the two years or so that When in Dome went dark we ended up producing our latest show, Grossology and You. We worked with Sylvia Branzei and Jack Keely, the author and illustrator of the Grossology book series, to create the show. If you’ve never heard of Grossology, you should check it out. It’s written for middle school aged kids to teach them about the human body using “gross” things like farts, puke, snot, etc as a hook. And the Grossology traveling exhibit is one of the most popular science center exhibits ever. We also talked Scott Myers, who wrote the scripts for several Hollywood movies such as K-9 and runs the influential screenwriting blog Go Into the Story, to write the script. Scott made it funny and gross – perfect for any 7-12 year olds you may know.

Check out the trailer:

Morehead at Fiske Fest

August 20, 2015

Just got back from the Fiske Fulldome Film Fest at CU Boulder last week where we screened Grossology and You and The Longest Night: A Winter’s Tale to a crew of fulldome professionals and general audiences.

It seems the industry has stepped up their game in general in the past few years. We saw some great shows all around, but leading the pack was National Space Center’s We Are Stars. Not only did it win best show and best soundtrack, but it might have been the best fulldome show I’ve ever seen. Beautiful, engaging, informative and fun. Just a fantastic film.

Also great was California Academy of Science’s Habitat Earth. As usual, they started the show with a mind blowing immersive and dense scene but continued on to explore different beautiful environments and scales before moving to the more motion-infographic scenes of the Earth. A nicely done, highly polished show.

But overall, there were a lot of good entries. In fact, there were more good shows than I’ve ever seen at a fulldome festival. Hopefully, this trend will continue.

BTW, when I told people I was going to a fulldome planetarium film festival in Colorado, most people assumed it would be like the video below.