Changing the Sweet Spot

December 1, 2010

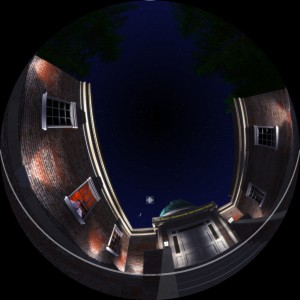
With each production we learn a little more about the trends in the industry. One thing that has made itself clear is that tilted domes require consideration when picking the sweet spot for viewing fulldome video. You want the bulk of your content to show up in or around this sweet spot. If something is produced for a flat dome, the sweet spot would be about 45 degrees up from the spring line, and the horizon just visible around 5 degrees. This works nicely to create a natural feeling as viewers sit back and experience the content in a flat dome.


However, if you take that same content and place it in a tilted dome the audience feels as though they’re perpetually looking down a hill, and creates a kind of mental confusion that breaks the immersion.

In order to resolve this problem, we shift everything up about 15-20 degrees. This creates a natural feeling for most tilted domes, and doesn’t disrupt the viewing experience of flat dome viewers when they sit back in tilted chairs.

To help us keep this in mind we created an overlay to use while viewing our animatics to make sure we don’t stray too far from the ideal sweet spot and framing of content.

5 Camera Rig for Paths

November 19, 2010

In our new show that’s currently under production, there are a lot of very deliberate camera moves and turns. Attaching our old 5 camera rig to a motion path I found that there were a lot of problems that popped up. Namely whenever the camera would need to rotate Maya would often do strange calculations to get from one key to another (At least in forward kinematics keying). I needed to find a way to separate the different axis so I wouldn’t have to fight the rig.

What I came up with was our 5 camera rig built for a path!

What’s great about this for us is a couple things. With the X and Y axis separated we get a lot of control with no weird rotations in there. We have guides to show where the sweet spot is, at both 45º and 60º respectively. What I’m happiest with is a roll feature I put in. The roll is especially useful because I made it so that when you roll the camera, it stays centered on the sweet spot in both the 45º and 60º settings.

The only thing its missing is a look at constraint, which I hadn’t had the time to include. Here’s the hypergraph hierarchy:

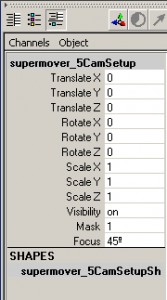
And lastly the attributes as seen on the supermover:

The Mask attribute is to turn the useBackgroundShaders on and off, incase you want the render to not cut off the dome master.

What good is all this info without the file itself though to use and mess around with?

Well here it is!

http://morehead-mrmc.apps.unc.edu/whenindome/wp-content/uploads/2010/5camPath.ma

City engine

November 19, 2010

In the new show we’ve got in the pipe, one of the first elements on screen is a futuristic city. The job of tackling this flying through an unreal landscape of large modern sky scrapers and a smog filled city grid would only be possible if it could be generated procedurally. That is without modeling and meticulously placing every building and asset in the screen.After doing some research I chose to use the City Engine (http://www.procedural.com/).

The functionality of this software seemed promising. Be warned there is a steep learning curve if you want to start really customizing things. Once you’ve tackled how to implement the design elements, and what is going on behind the scenes, you start to get an better understanding. Our hope is this will be helpful in the future for other projects, and since it’s capable of importing street map data you could generate any real city you wanted. They offer a great set of educational discounts and plenty of out of the box functionality. I will write another assessment once I’ve had more time and experience with it, but for now if you’re interested in a dynamic city generator that is very robust this is definitely worth a look.


image is an example from www.procedural.com

Earth, Moon & Sun wins 2nd place overall at Astro Projection International Film Festival

November 15, 2010

Earth, Moon & Sun picked up the silver medal at the Astro Projection International Film Festival hosted by the Gwacheon National Science Museum in Gwacheondong, South Korea. More than 10,000 people in Seoul attended the festival, so we figure they got a pretty good sample group. Unfortunately, we didn’t place in either the Synchronized Swimming or Curling events, but we’re pretty happy nonetheless.

Gwacheon National Science Museum also decided to lease the show, which makes EMS the best selling show of 2010 in the Sky-Skan catalog! Woohoo!

Magic Tree House: Space Mission Trailer

August 6, 2010

Check out the new trailer for our newest fulldome show Magic Tree House®: Space Mission. We’ll be debuting it at the Imiloa Film Festival in Hawaii in October.

Since its debut, the beloved Magic Tree House® book series has been a perennial best-seller. Published in 32 countries and 28 languages, the series focusing on the exploits of the brother-sister team of Jack and Annie has sold more than 64 million books in North America alone.

Now, UNC Morehead Planetarium and Science Center, in partnership with authors Will and Mary Pope Osborne, brings the blockbuster Magic Tree House® franchise to fulldome theaters for the first time ever.

In Magic Tree House® Space Mission, a mysterious “M” sends the intrepid Jack and Annie on a fun-filled journey to discover the secrets of the Sun, Moon, planets, space travel and more. Aligned with early elementary information skills learning objectives, this beautifully-produced show is a winner with Magic Tree House® fans of all ages and school audiences alike. Audiences age 5-10. Running Time: 30 minutes.

An original UNC Morehead Planetarium and Science Center production, written by Will Osborne, co-author of Space, the non-fiction companion and research guide to the Magic Tree House® book Midnight on the Moon.

5 camera Rig in After Effects

July 19, 2010

As most of you know there are not very many production tools out there specifically designed for us Fulldome folk. So often times we have to get creative with what we have. Early on in my experiments with working in Fulldome, I created this little project. (download AE project here).

It takes the 3d space of After Effects and funnels it through several different cameras and then in a master comp stitches them together using the After Effects plug-in from Sky-Skan, DomeXF. I’m sure it can be done with the AE FullDome plug-in, just some of the settings will be different.

At the root is a 3d Scene.

This one scene is placed into 5-6 comps, then each of those comps gets a different camera.

The key to remember is to check the “Collapse Transforms” mind sweeper looking button on the layer in each camera comp.

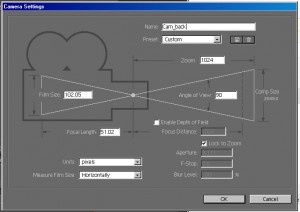
These are the settings for each camera in each comp. Each Comps Dimensions should be 2048×2048 if you’re trying to create a full 4k final output. You could make them smaller, ie, 512×512 to make a 1k… as long as they’re a 1:1 ratio.

Now you just point the cameras in their respective comps based on these settings.

Now that you’ve got  your 5-6 different views of the AE3d Scene, you move those into 1 master stitch.

Each comp now a layer gets the DomeXF plug-in, with their respective settings, and then you’ve got a fisheye image of the 3d space in after effects.

Now something of note, I haven’t gotten the Down camera to work with the DomeXF, but I believe it works with the FullDome Plug-in.

I’ve recently started playing with some expressions so I can link the attributes of the DomeXF settings on each layer so I can adjust the dome tilt, though if you’re using the FullDome Plug-in that’s that’s pretty easy. You just link the dome tilt field  on each of the layers to either a slider, or to one common layer.

Hope this is helpful.


Rigging the Body

July 12, 2010

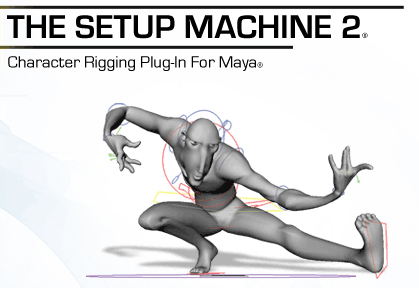
Being the small studio that we are, the members of our team are generalists in trade. Jack of all, master of none, we’ll wear whatever hats are needed for production to get the job done. This can naturally cause some difficulty when we need to wear those hats that calls for intensive scripting and planning, in this case ‘rigging’. In the last post I made, I focused on the facial rigging. A talking head can only take us so far, we need to have that body move as well. In order to save time, and give us more controls over our models we use The Setup Machine 2.

Being able to take these rigs and apply them to multiple characters of different body types is extremely helpful and a huge time-saver. Of course TSM2 doesn’t replace a good TD who could give you a very custom-made rig with controls you wouldn’t have otherwise, but for a low budget production with a small team like ours TSM2 gives us what we need.


http://www.anzovin.com/products/tsm2maya.html

Rigging the Face

June 29, 2010

One of the steps for building a character (in this case with Maya) is to rig them. That is to say, putting the bones inside the characters and adding the controls to manipulate them. This is generally just for the body, and unfortunately only half the battle. The remainder that we have to worry about is the face, which in itself a whole other beast.

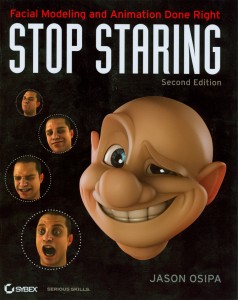
A beast that is tamed much easier with this wonderful book at your side:

This is a book written by Jason Osipa, which details and teaches ways to rig the face to have all the expressions you could think of. The best part is that with the CD that comes with the book, he provides you the examples seen in the book, as well as the mel scripts and resources to apply to your own character! You really only need to make the blendshapes, and then the scripts he provides plugs it all in for you! It’s a huge time-saver, and will really make your characters jump out.


You can pick it up through Amazon with this link:

http://www.amazon.com/Stop-Staring-Facial-Modeling-Animation/dp/0471789208/

ISBN: 978-0-471-78920-8

Balancing the scale

June 22, 2010

By the term scale, I am referring to the relative size of objects as they’re perceived on the dome in relation to each other.

Recently, while constructing the office of our stories instigator, we noticed an interesting optical illusion. Though the two spaces were a rough test to try and sell the idea that this characters office was massive, they didn’t feel very large once we looked at them on the dome. There were two versions of the space in question. The images better illustrate the difference in size. The objects in the center are to represent a person 6 ft tall next to a shorter person standing behind a desk.

The following videos are indeed two different versions of the room, but due to the uniform scale on the environment, and the lack of visual cues, you’re unable to determine the scale of the space.


After this discovery, we went back to the drawing board. The issue is that we needed to establish scale, and big part of that is incorporating more information.

We broke up the scene a bit more, and added the guardrail element to give us an reference for our eyes, and mind to fill in the missing details.  In a traditional flat screen format, we can use distorted perspective to help sell distance, and depth.  In photography there are ways to blur the focal range, or different lenses can be used to elongate a space. In the dome world that type of visual trickery isn’t as simple, as the perspective is already distorted to work on a curved surface.

This is by no means a new invention. Traditional painting, and photography often times work a person or some other reference object into an environment to help people establish a sense of scale.


Storyboarding Theory

June 11, 2010

As the storyboarding phase is drawing to a close, I thought I’d touch on a couple things that I’ve learned.

Our new show, Solar System Odyssey, is heavily driven by story. Characters are continually interacting with each other, both in dialogue and action. This brings up challenges that haven’t been issues in shows prior to this one. In previous shows, interactions between the characters had been strictly though dialogue. Many of the voices were heard without seeing exactly who was doing the talking. In our first show, Earth, Moon and Sun, the main character, Coyote, would converse with a narrator that the audience would never see. Coyote could simply reply to the narrator by facing towards the audience. On the other hand, when more than two characters can be seen on screen, all interacting and talking to one another, things were a bit different and sacrifices needed to be made.

One of the great things about the dome is being able to be immersed in the environment. Current best practice would typically say that if you’ve got the dome real estate, use it. However, what we really want to showcase during these segments are the conversations between the characters. The audience needs a focus and we want to discourage their eyes from venturing around. Sure, the inside of the ship may look pretty and the viewer’s eye will want to look around it, but it’s truly a secondary element. We want their eyes focused on the character’s faces and body movements.


What’s all this leading to?


This map I affectionately call the “Dance Chart”.

For each scene I’ve created, I’ve drawn a chart in which I map out the character’s key points in the scene, as well as the location and front direction of the camera. I’ve been very careful to allow for good staging for the characters at most times, and the immersion comes from the deliberate and timed movement of the camera moving through the environment. The audience becomes like a fly on the wall, watching the scene unfold in front of them. While the characters are generally in the front half of the dome the majority of the time, by keeping the camera in near constant moving and framing, an immersive sense is developed and maintained.


When creating a Dance Chart, some key elements to think about are these:


•   An element of focus (Character, Object, Follow the bird)

•   Lots of play with foreground, midground, and background elements

•   Don’t move the camera too fast. Keeping a focus point helps, but only to a certain degree.


The element of focus allows for the camera to move without there being much motion sickness. Having foreground, midground, and background elements shifting and moving helps to sell the environment and reinforce the camera movements. The camera speed should maintain graceful elegance with its motion.


When you want to encourage the audience to look around, keep the camera still or moving slowly and deliberately. It’s our experience that people favor movement that compliments the direction they’re already looking.