There were a lot of things I’ve picked up over the past couple projects that I wanted to share. It’s a bit of the process and includes After Effects expressions and using hotkeys for animating in Maya. This first part details how I animated the characters in our show: Grossology and You. You can see a trailer for this show on Fulldome Database:
http://www.fddb.org/fulldome-shows/grossology-and-you/
Much of what is posted here can be found in the Digital Tutors series Rigging and Animating 2D Characters in After Effects by Dan Gies, which can be found here: http://www.digitaltutors.com/tutorial/796-Rigging-and-Animating-2D-Characters-in-After-Effects
At the start of the Grossology and You process, we wanted to make sure I had enough time to animate the characters. We went with a game show type format, which meant we’d need multiple characters representing contestants, a show host, and a character for the audience to identify with. Two ways for us to help lighten the load on my end were to have a limited amount of time we’d see the characters, and to make them very simple in rigging. The lessons we learned through Solar System Odyssey really drove these points home. I spent roughly 3-4 weeks sketching, modeling, texturing, and rigging each of the three characters with The Setup Machine 2 and the Stop Staring method for the faces. Unfortunately, this caused the time allowed for animating to be crunched, and sadly, the work put into the character’s faces was unused along with unpolished body animation. In total, there were roughly 15 minutes of character animation in the show with a minimum of 3 characters on screen at all times. It was from this lesson that we made sure Grossology and You had a significantly smaller amount of time spent with the characters, and they would have only what’s needed in terms of rigging.
For Grossology and You, I had the pleasure to work with the artist for the Grossology book series, Jack Keely. Jack sketched up character designs for us, and when they were finalized sent them my way to get rigged.
The process for the rigging was mostly straight-forward. I used Dan Gies’ tutorial on Rigging and Animating 2D characters, and adapted it for the simpler drawings (his tutorial also included things like animating bump maps IIRC which I didn’t opt for using). The character’s body (in this case Boogie) was rigged using DuIK.
A major expression used in this process is to parent Puppet Pins to Nulls. Here is the expression:
n=(pickwhip null of choice);
nullpos=n.toComp(n.anchorPoint);
fromComp(nullpos);
And an example from Boogie:
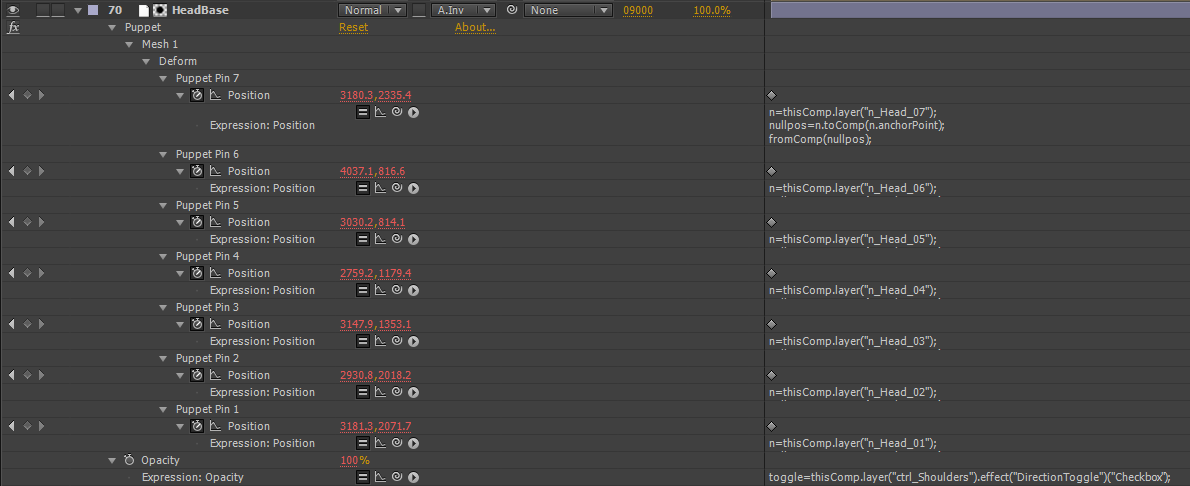
What this allows is the use of DuIK to create the Inverse Kinetics used to control the puppet pins. It also allows for other fun ways to control the character.
I worried that seeing 2D animated characters on the dome might not be that interesting to watch for long periods of time, so I decided to have a lot of secondary animation to keep it interesting. I also wanted it to be automated for the most part, to help save me time. Using the nulls controlling puppet pins, I could accomplish a very basic sense of secondary motion by having the movement delayed.
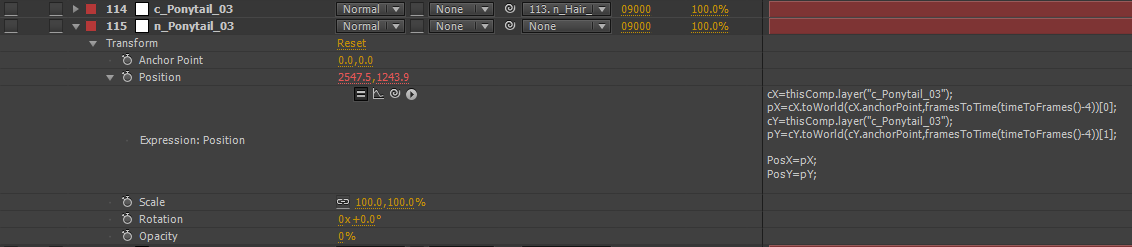
I took the Null controlling the Puppet Pin and used a frame delay expression to “parent” it to another null. Here’s the expression:
cX=thisComp.layer(“null of choice”);
pX=cX.toWorld(cX.anchorPoint,framesToTime(timeToFrames()-1))[0];
cY=thisComp.layer(“null of choice”);
pY=cY.toWorld(cY.anchorPoint,framesToTime(timeToFrames()-1))[1];
PosX=pX;
PosY=pY;
[PosX,PosY];
I can then parent that controlling null to whatever I’m animating the position of, in this case Boogie’s head:
On my next post I’ll talk about what I did for tackling the characters in our newest show, Take Flight!