Awesome After Effects tutorials

January 4, 2010

The following is a wonderful source for after effects ideas, and production assets. If you’re making full dome content chances are you’re using Adobe after Effects because of its support for 4k compositing, and because its fairly easy to use. Andrew Kramer has a quirky sense of humor in all of his tutorials, but also does a great job explaining process, and some excellent design ideas and procedures. Anyone who’s asked me questions about understanding the program I usually point them to this link.

and for good measure, http://videocopilot.net/

The tutorials have been free, but some of his production bundles are worth taking a look at. For someone new to After Effects there are some great starter tutorials, and for some of us more advanced types he’s always coming out with some new and challenging material.


Fulldome Festival in Germany

December 18, 2009

fulldomefestival09We just entered our first production, Earth, Moon and Sun, into the 2009 Fulldome Festival at the Zeiss Planetarium in Jena, Germany. This year, they’re allowing full length shows to be entered into the competition. Previously, the competition was limited to shorts under five minutes, just like DomeFest. I seriously doubt our show will dovetail into their theme this year, “Bauhaus-in-the-Stars,” but we’ll give it a shot anyway.

The english version of the site is a bit confusing and has some dated material, so the best place to get clear info about the festival is actually on the Zeiss website here.

LowPoly Model for High poly crowd

December 7, 2009

We’re working on an experimental short that is designed to help us break the daily grind of working strictly on planetarium shows. The short is intended to be entered at DomeFest. An interesting challenge has arisen as we try to generate a crowd that should ultimately cover the dome surface.

My number one priority was to make sure the object that was to be duplicated thousands of times was as lowpoly as I could get it. LowPoly, reffering to an amout of the shapes known as polygons that define the shape of a computer generated model.

The resulting insect is based upon the anatomy of a pill beetle.

bugRendered

This doesn’t look like much up close, but its intent it to be very small. I was able to make this bug for less than 1000, polys.

bugWireframe

But when you’ve got 5000 on the screen at one time, then you’re talking about close to 5 million polygons, all being animated. The bugs legs and antenna had to move. We couldn’t just have them sliding around being pushed or dragged by some imaginary force. All of that information can cause some instability in the scene, so to make life even easier I worked with smaller crowds and plan to layer them up to appear as one large crowd in the final composite.

This  one bug was duplicated multiple times and simulated in a crowd simulation.


The Following animation is a short test showing a crowd of 500 bugs approaching a dome structure.


Render Computers vs Workstations,

November 30, 2009


DeadlineMost network rendering engines can access the cmd line functions of multiple software packages and run their rendering engine without requiring costly licensing. (For Example, After effects, Combustion, Maya, 3dmax, etc.) As long as you have a workstation license you can install and operate these on as many Rendering computers (slaves) as you’d like. Other Software, and namely plug-ins, require licensing, and make a distinction between Slaves, and workstation functionality. Plug-ins like Mental Ray, Render man, Final Render, Trapcode, Vue, and Dreamscape, require licenses for each slave, and sometimes per processor in the slave. You can imagine with 3 workstations and 23 slaves, each containing 2 cores, and 8 processors the cost can start to get a little extreme.

WorkStationRenderSlave

So the above mentioned software providers are leaders in the industry, and even with the proper licensing, there can still be hick-ups in the installation of the software onto the slaves, and getting all of the tools to talk with each other and work properly. That’s if you were working in a flat screen. Most of the above mentioned tools were developed to be primarily used on standard flat image. Take into account adding a level of complication like Full dome rendering, and you’ll find yourself with even a larger set of hurtles to overcome. There is a wonderfully active group in the full dome community. They’re busy creating tools, and plug-ins to make our work flow easier and more streamlined. The main issue is these tools are free and generally work as Workstation only mode, and quite often software version specific. Some major software providers are acknowledging the full dome application of their product and have looked at these tools and started to integrate them into their products. Hopefully this trend will continue, and accelerate as full dome video becomes more popular.

As a content creator on a small staff, one spends a vast majority of their time making sure the slaves are doing their jobs. Sometimes its easier to do things on a workstation, but it can take an awful amount of time.

Morehead is now a member of IMERSA

November 25, 2009

header_bkg Morehead just became an Institutional Member of IMERSA (Immersive Media Entertainment, Research, Science & Arts). Their website is in the midst of a redesign at the moment so some of the links are grayed out, but word is that there’s a new site coming down the pipe.

According to their website,  “IMERSA is an international professional association advancing the art, science, profile, integrity and common interests of large-format digital immersive media and group interactive entertainment and cultural experiences including (but not limited to) immersive digital theaters and digital dome (fulldome) planetariums.”

We’re pretty psyched to finally join up with this crew. It’s been our intention from the beginning to get more involved in the fulldome community. This blog was the first step and joining IMERSA is the second.  Hopefully we’ll be able to help shape this new medium for good and not evil. Although evil is fun…and speaking of evil, we’re just about finished up with our first fulldome short and it’s very eeeeevvvvvillll. More on that later…

Trax Editor and Time Warps: Part 3

November 24, 2009

So we animated our character, created a cycle in the trax editor, and increased the number of times that our cycle will repeat. When we look at our trax editor, we should see something like this, where we can see the length of our original cycle, and the number of times the cycle repeats itself. It’s represented through the lighter colored ‘phantom’ cycles.

TraxEditorClipCycle

Here’s where things are going to start to get a little weird. You may think at first that now you can apply the time warp, as I had thought myself. But the time warp only affects and represents the cycle, it does not include the post-cycle repeats.

CycleTimeWarp01

CycleTimeWarp02

Since the goal is to have our character slow down and then speed up again, we’ll need to make this one long animation clip. We can do this by merging what we have, making it a new animation clip. We’ll want to select our clip and go to:

Edit > Merge > Dialogue Box

TraxEditorMerge

Now we can pick what we want the name for our clip to be. We can just leave the Add to Trax radio button clicked so that the trax editor will be automatically updated with our new merged animation.

MergeClipOptions

With our new merged animation, its time to do some speed adjustments with time warp! Go ahead and select our clip and go to:

Create > Time Warp > Dialogue Box

TraxEditorTimeWarp

Go ahead and hit apply (Option to Enable Time Warp Curve checked), and open up the graph editor to check out our new keys for the time warp. With the animation clip selected in the trax editor go to:

Window > Animation Editors > Graph Editor

And select the Time Warp in your clip so that we can see just those keys.

TimeWarpGraphEditor

Having applied a time warp to the clip, Maya will automatically create two keys. No matter how long you were wanting your animation to be, there will always be a key at 0,0 and 100,100. What’s very important to know is that this represents the percentage of the clip. The X axis is no longer represents the frames of our animation, but the percentage value of where we are in the trax editor clip. Frame 25 in the graph editor is 25% the way into our clip. Frame 75 is 75% into it, and frame 100 is the end of the trax editor clip, or in other words 100%.

The same happened to our Y axis. The Y axis has switched to percentages now, and those percentages represent the animation inside our trax editor clip. When the X represents what time the change happens in the clip as it plays, the Y represents the progression through the animation inside the clip.

So we have our normal graph here:

TimeWarpGraphNormal

We’ll never want to exceed 100 on the X axis, as you can’t have greater than 100% of the clip. If you were wanting to suddenly halt the animation halfway through, it would look like this:

TimeWarpGraphHalfway

What this says is that once we reach the halfway point of the entire clip, we will no longer progress through the clip. Even though we’re still continuing along the X axis, the animation inside the clip is holding at the 50% mark, or the halfway point in the clip.

If we want to double the speed with no variation, we would make our last key end at 50,100.

TimeWarpGraphDoubleThe reason it ends at 50% on the X axis, is because it’s moving double the speed, it will reach the end in half the time.

If you were wanting to get fancy, and have your animation halt, ease to moving in reverse, and then suddenly going forward while easing into a halt, you’d look at something like this:

TimeWarpGraphGoesCrazy

As you could imagine, this unfortunately can’t be an exact science. If you’re needing to be very precise on which frames you want to have these speed ups and slow downs happen, I would recommend making your animation clip divisible by 100 to make the math simple. Hopefully this will help you if you’re a little lost with using time warps.

Trax Editor and Time Warps: Part 2

November 24, 2009

So in part one we created the walk cycle and our character set. Now it’s time to bring that cycle into the trax editor!


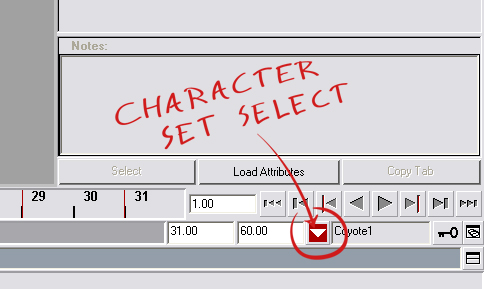
First we want to make sure our character set is selected. You’ll want to click and hold onto that down arrow button to the right of your timeline length numbers.

CharacterSetSelect

The selected character is shown to the right of that, as evident through the screenshot. Something to note is that I forgot I had an object or control already named Coyote, so maya automatically added a 1 after it. It’s ok and shouldn’t affect anything that we’ll be doing. I left that mistake in there to let you know that it would still be ok if you accidentally did the same.

Now that we have our character set selected, it’s time to make that cycle actually cycle! Your trax editor probably still looks like what it did before. All we see is a soundtrack. To be able to see our new character in the trax editor we have to load it. With your character set selected (check the bottom right), press the Load Selected Character button found here:

TraxEditorLoad

TraxEditorCharEmpty

A layer has been created inside of the trax editor, with the name of our character set. It can’t be seen yet, but this is where our cycle will be kept in. With our character set still being selected (bottom right arrow still red with the name of your character set written), go to:

Create > Animation Clip > Dialogue Box

TraxEditorAnimationOptions

This presents us with some new options!

CreateClipOptions

The name is what we want to call the clip. In this case its a walking animation, so I just use Walking. The next important option is to choose where to put the clip. How trax editor works is by keeping the clips we create in what’s called the Visor.

Since we want to use the clip already, we can skip that extra step of dragging and dropping from the visor, and let the clip be put into the trax editor for us. The time range is how long the cycle is. If you know what your frame range is you can specify it here.

TraxEditorClip

Sweet! Now we have our cycle! All the keys you have on your character should have disappeared, and we now have our clip in the trax editor! Now if you were to extend the timeline so that its longer than your clip, you should see that.. it still stops after the first one! That’s because we have to extend the clip so that it can cycle! There’s a couple different ways to do that. You can do it in the trax editor, or by selecting the clip in the trax editor, and bringing up your attribute editor (alt-a).

Let’s say we want our Coyote clip to extend 100 frames. We can do that by moving our mouse to the right hand side of the clip in the trax editor, holding shift, and then clicking and dragging. What it does is add more Post Cycle‘s, which is how you would extend it via the attribute editor.

ClipAttributes

Now the bulk of the work is out of the way. Unfortunately that doesn’t mean it’s time for the easy part. Next installment is going to be the actual use and practice of using the time warp. Things are only going to get more confusing from here on out, but bare with me and it’ll be hopefully worth it in the end! Stay tuned!

Trax Editor and Time Warps: Part 1

November 23, 2009

This isn’t directly dome related, but I thought I’d post about it anyways. I ran into a recent problem in Maya having to do with the trax editor. I wasn’t that well-versed in the trax editor’s inner-workings, so there was a steep learning curve for me. I wanted to write about what I learned, so that someone else who hasn’t ever used the trax editor, might get that extra step in the right direction.


Non-Linear Animation

These are the fancy words used to describe the purpose of the trax editor. It may be a little confusing at first, but it basically just means cycles.

Linear

NonLinear

So now that we can establish the difference between Linear and Non-Linear animation, we’ll have to think which would suit us best for what it is we want to do. In my case I was needing to have a character walk. This is perfect for cycles, so Non-Linear animation is the way to go. Trax editor here I come!


But first we need a walk cycle!


Here we go! Just threw together this walk cycle very quickly as an example of what you may have.

Coyote

This was a quick walk cycle I threw together as an example of what you may have.  Coyote’s feeling pretty good about himself, and rightfully so! What we’re going to do is turn him into a:


Character Set

In Coyote’s particular case, his cycle is 31 frames long. Your cycle is most likely different from this length, so you’ll just want to remember to adjust the numbers so that they’ll fit your own animations. What we’ll want to do is open the Trax Editor. You can open it if you haven’t already by going to:

Window > Animation Editors > Trax Editor

You’ll be presented by this lovely window:

TraxEditorBlank

Now that we have Trax Editor open, its time to select our character so that we can make that character set! You’ll want to select everything that has a key on it. In Coyote’s case, it’s the curves that are used to control his joints.

CoyotePreSelectCoyoteSelect

Now that we have everything with keys selected, it’s time to turn him into our Character Set. We can do this by going to the trax editor and clicking:

Modify > Create Character Set > Dialog Box

TraxEditorCharacterSet

What this does is present us with our options for our character set.

CharacterSetOptions

So the important thing is to give your Character Set a name. It can be whatever you’d like it too be. In this case I called it Coyote. The other options depends on what you’d want. Usually the default is the way to go. If you also keyed the scale, you’ll want to be sure to uncheck that one. I’ve left mine how you see it here. After you hit ok, you shouldn’t need to touch your controls or joints again!

Now that we have our character set created, we can move onto to making the cycle in the trax editor, which is continued in part two!

Full dome 2d compositing tricks

November 9, 2009

I figured its about time to reveal a little bit of the tricks we’ve picked up for doing simple effects on the dome that enhance the viewing experience and make production a little less 3d heavy. Granted some of these effects aren’t physically accurate, and if done to certain extremes can break the illusion of the dome space.

When using a panorama on the dome, or any type of still image, the viewer will become aware that it is a still and quickly grow board of it once it hits a static position. So to prevent a sequence from becoming static we will add a slight rotation of roughly 5 degrees or more depending on length to the entirety of a shot. What this does is keep the pixels moving on the dome surface and has a subliminal effect on the viewer. The won’t notice its there, but they’ll notice it if it wasn’t there.

Push

Another trick is using scale. Scaling a dome master or a panoramic actually translates into movement on the dome. A scale with its anchor point at the zenith translate to vertical movement up or down into a panorama. Coupling this with some images of clouds on 3d layers in after effects you can give the illusion that you’re moving up off the ground and into space without having to create a 3d scene and camera move. Another trick involving scale is to use a null object on a dome master and scale toward the point of focus. Doing this by 3-10% over the course of several seconds gives a slight push that focuses the viewer toward the source of the scale. True you’re scaling pixels and distorting the image over the dome surface, but by only increasing it by a little amount over time you’ll never notice any resolution loss, or the angular distortion that takes place. Also by offsetting your foreground and background images, i.e. your panoramic foreground and stars as your background. You can simulate the natural parallax that happens in a camera move.

ZenithScale

Keep in mind that nothing should ever really stop moving on the screen unless its an intentional freeze frame to illustrate a point. Rather than taking an object’s scale from 0-100 in 3 seconds when your sequence is 10 seconds long. Consider taking your object from 0-95 in that 3 seconds and then ease in that last 5% over the course of the remaining 7 seconds. The effect will look more polished and make your point of focus a touch more dynamic.

enjoy these video examples.

<img src="http://whenindome.web.unc.edu/wp-content/uploads/sites/10008/2009/11/Pushmovie-83×83.jpg"

<img src="http://whenindome.web.unc.edu/wp-content/uploads/sites/10008/2009/11/ZenithScaleMOVIE-83×83.jpg"


Transitionally Transitional

November 3, 2009

We may have briefly touched on this idea, but I wanted to address this more directly.


A lot of techniques used in flat screens naturally do not translate very well into the dome. Wipes used for a flat screen would work differently for domes, linear or radial. Things that should be kept in mind is having to account for the distortion of the projection onto the curved surface. It doesn’t mean you can’t do these sorts of transitions, you just have to approach them with a different understanding.


When knew we wanted to do a linear wipe for a particular scene in Earth, Moon, and Sun; for that show we used an animatic for the flat screen. We didn’t think it to be a problem until we started production. The wipe in question was one coming from the top of the frame to the bottom. The thing was that since you can see above you in the dome, the wipe wouldn’t really be possible, or effective. We had to scramble to figure out another way to have this linear wipe, and to make it fun and interesting at the same time.


The solution was to treat the dome as a sphere, and have our hero, Coyote, flip us onto our backs, letting the wipe come from behind us to the front.


CoyoteFlippingOut


Transitions from one shot to another when not using cuts must really be thought through very carefully for the dome. Creativity can really be challenged, and lots of new and interesting ideas can come from unlikely places.