So in part one we created the walk cycle and our character set. Now it’s time to bring that cycle into the trax editor!
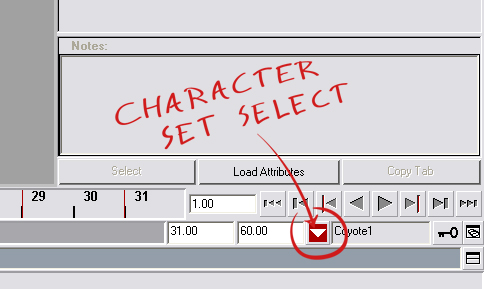
First we want to make sure our character set is selected. You’ll want to click and hold onto that down arrow button to the right of your timeline length numbers.
The selected character is shown to the right of that, as evident through the screenshot. Something to note is that I forgot I had an object or control already named Coyote, so maya automatically added a 1 after it. It’s ok and shouldn’t affect anything that we’ll be doing. I left that mistake in there to let you know that it would still be ok if you accidentally did the same.
Now that we have our character set selected, it’s time to make that cycle actually cycle! Your trax editor probably still looks like what it did before. All we see is a soundtrack. To be able to see our new character in the trax editor we have to load it. With your character set selected (check the bottom right), press the Load Selected Character button found here:
A layer has been created inside of the trax editor, with the name of our character set. It can’t be seen yet, but this is where our cycle will be kept in. With our character set still being selected (bottom right arrow still red with the name of your character set written), go to:
Create > Animation Clip > Dialogue Box
This presents us with some new options!
The name is what we want to call the clip. In this case its a walking animation, so I just use Walking. The next important option is to choose where to put the clip. How trax editor works is by keeping the clips we create in what’s called the Visor.
Since we want to use the clip already, we can skip that extra step of dragging and dropping from the visor, and let the clip be put into the trax editor for us. The time range is how long the cycle is. If you know what your frame range is you can specify it here.
Sweet! Now we have our cycle! All the keys you have on your character should have disappeared, and we now have our clip in the trax editor! Now if you were to extend the timeline so that its longer than your clip, you should see that.. it still stops after the first one! That’s because we have to extend the clip so that it can cycle! There’s a couple different ways to do that. You can do it in the trax editor, or by selecting the clip in the trax editor, and bringing up your attribute editor (alt-a).
Let’s say we want our Coyote clip to extend 100 frames. We can do that by moving our mouse to the right hand side of the clip in the trax editor, holding shift, and then clicking and dragging. What it does is add more Post Cycle‘s, which is how you would extend it via the attribute editor.
Now the bulk of the work is out of the way. Unfortunately that doesn’t mean it’s time for the easy part. Next installment is going to be the actual use and practice of using the time warp. Things are only going to get more confusing from here on out, but bare with me and it’ll be hopefully worth it in the end! Stay tuned!


2 Responses to “Trax Editor and Time Warps: Part 2”
When in Dome… :: Production When in Dome :: Trax Editor and Time Warps: Part 1
[…] Trax Editor and Time Warps: Part 2 […]
jigesh makwana
thanks aloooooooooooooooooooooooooooooooooooooooooooooooooooooooooooot,guysssssssssssssssssss thanksssssssssssssssssssssssss